After my WD NAS (network attached storage) drive failed, I realised it was too expensive to replace it. All I needed was a drive on my network for accessing occasional files and backing up data.
I decided that I could use a Raspberry Pi to create my own NAS drive. However, working with the terminal is a pain in the arse so I first installed Webmin, a utility to provide a GUI to the Linux based Raspberry Pi via a web browser. This allows me to run the Pi as a headless device with no keyboard, mouse or monitor attached.
To start I installed Raspbian with the “Boot to Desktop” option disabled and SSH enabled. This allowed me to use PuTTY to remotely control the Raspberry Pi. The default username is pi and the password is raspberry.
From within PuTTY on my windows machine I performed the following:
- First I changed the default password:
- I then added a new user:
- groups (this will display all the groups that are currently on the Linux box)
- sudo useradd -m -G “list all the groups from above separated by a comma” USERNAME
- sudo passwd USERNAME (to provide a password for the new user)
- Once this was done I shut down PuTTY and then restarted and logged in with my new username. I then performed the following updates and installations:
- sudo apt-get update
- sudo apt-get install ntfs-3g (install support for ntfs drives)
- sudo apt-get install samba samba-common-bin (install support for Windows sharing)
- sudo apt-get install xrdp (optional – to provide the facility to access via Windows remote desktop connection)
- I then installed webmin which turned out to be a bit of a process:
-
sudo wget http://prdownloads.sourceforge.net/webadmin/webmin_1.730_all.deb
-
sudo dpkg –install webmin_1.730_all.deb (this displayed dependency errors – Note double dash(-) before install command.)
-
sudo apt-get install libnet-ssleay-perl libauthen-pam-perl libio-pty-perl apt-show-versions
-
sudo apt-get -f install
- Once this was complete I added my username as a Samba user:
- sudo smbpasswd -a USERNAME
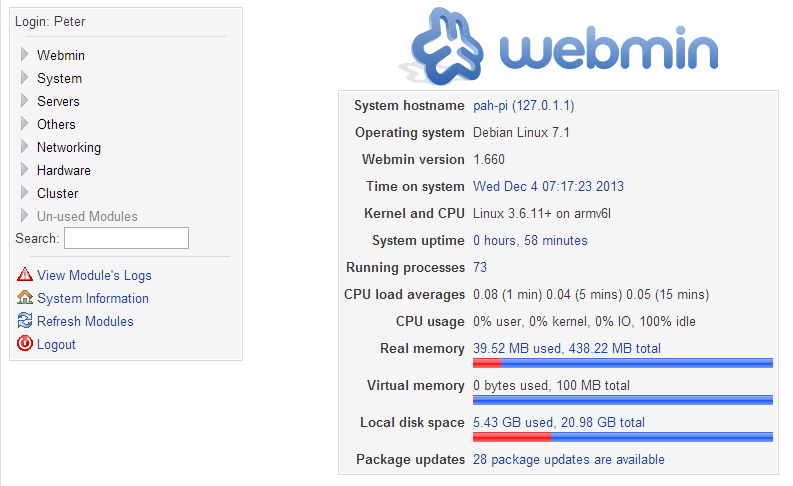
Once this process was complete I could now open up my web browser and access the webmin server using the following address: <raspberrypiIPaddress>:10000 to be presented with the login screen. Once logged in I was presented with the following screen:

Oh happy days 🙂
Now to set about configuring the system to allow sharing of a drive plugged into one of the USB ports. Note that once any changes have been made to select Save to apply the changes.
Browse to Hardware -> Partition on Local Disks.

If your drive is not mounted you need to mount it – I used /mnt/disk1 mounted on SCSI device A partition 1 – this is found in System:Disk and Network Filesystems in version 1.72 of webmin.
Now browse to Servers -> Samba Windows File Sharing and then select the Windows Networking icon. Here you can update the workgroup name and add a server name if you want to:

“Create a New File Share” option. In this page I used “data” as the share name and the partition I just created as the “Directory to share”:

Once this share has been created we need to allows access to the share. Select the share that you just created and then select “Security and Access Control”. Here you can control who has access to the share and whether the share is writable. In the following screenshot the share is accessible to user Peter and full read/write access and no guest access is allowed:

That’s it! You should now be able to use Windows file explorer to browse to your network share and access it.
Performance:
Write and read speeds of this system (Raspberry Pi B version) does not approach my dedicated NAS system but is usable for general file access.
Testing using a 200MB file gave a write speed = 3 MB/s and a read speed = 5.8 MB/s.
Update on performance:
Last week I got my hands on a new Raspberry Pi2 and gave it a whirl as a NAS drive to see how it compares with the older B version. As it turns out the performance improvements are quite large.
Using a drive formatted as ntfs and a 200MB test file I obtained the following results:
Write speed = 8.2 MB/s
Read speed = 11.0 MB/s
As can be seen this is about a 100% improvement on the older Pi and almost rivals my dedicated NAS unit (which has a read speed of 14 MB/s). I’m impressed.